• Skip to secondary menu
  • Skip to main content
  • Skip to primary sidebar
  • Skip to footer
  • About My Blogging World
  • My Dogs
    • Finally Found an Indestructible Squeaky Dog Toy!
  • Favorite Recipes
    • My Famous Sweet Pickled Jalapeno Recipe
  • Military Pride
  • Photography
    • Project 365
  • Joy of Advent
  • Affiliate Disclosure

3 Quarters Today

My Life, my photography, my passions

  • Graphic Design
  • Military Gift Store
    • Military Gift Ideas
    • Marine Corps Gifts
      • Marine Mom Gifts
      • USMC Veterans
      • USMC Ornaments
      • Boot Camp Books
      • Custom Designed USMC Gifts
    • Army Gifts
      • Custom Army Gifts
  • Shopping at 3 Quarters
    • Unique Photography Gifts
    • Unique Dog Gifts
    • 3 Quarters Photography Shop

Photography

Use of Fill Flash Outside

June 12, 2012 by info@3QuartersToday.com

I’ve read about using fill flash, but I had never tried using this photography technique until last week. Now I think it is the most valuable tool ever invented on the camera (just kidding) .  Many people totally believe in natural lighting, while I can respect that I also believe in using tools to improve results.

Use Fill Flash Outside

When my daughter and I took a trip to Missouri and Arkansas to tour a few colleges we decided to make it a camping trip. Two out of the three days we camped out in tents by the lake and it was wonderful  The scenery is so unlike the plains of Nebraska I was itching to capture and play with different settings on my camera. My daughter was a willing subject on this trip and I was bound and determined to make the most of the opportunity.

With so many trees around she was constantly in the shade. The first photo above was disappointing  as I had too much shadow on her face. Then the brainstorm. “Let’s try the flash? Stay right there and smile. ”  I popped it open, heck why not? I set the intensity on the menu as high as it would go as I was using the 75-300 lens from about 20 feet away.

What a difference! The extra lighting opened up the shadows, warmed the tone of the photo, and overall enhanced the image.

Photo was taken with a Canon Rebel XS so it’s far from a professional camera by far, but I got much better results straight out of camera which is the ultimate goal of any photographer. Time saved in post production is more time shooting.

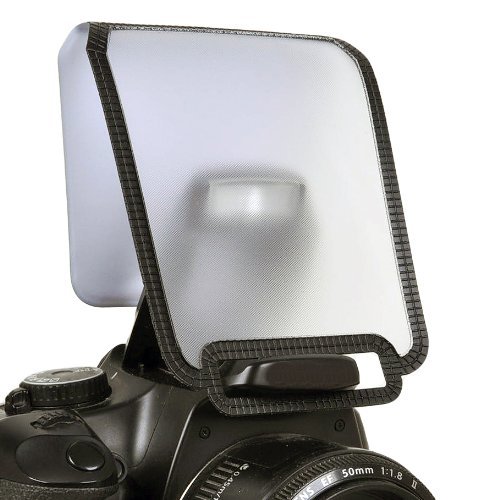
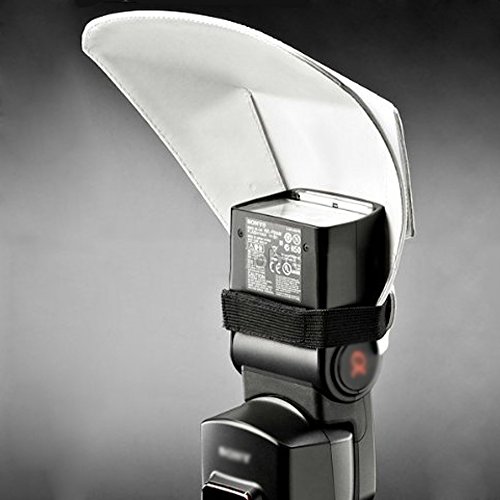
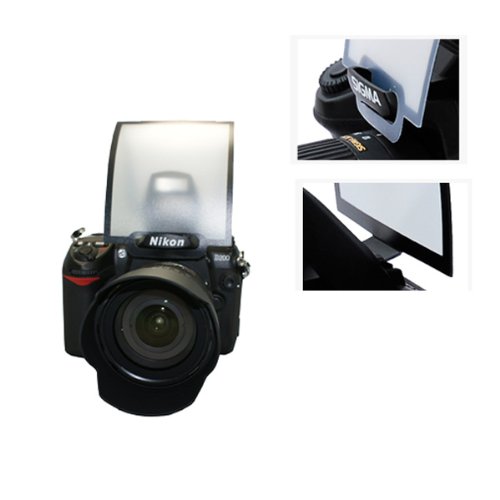
Using a Flash Diffuser

Many times people avoid using a flash for the dreaded “flash burn” on the skin and highlights. Professional photographers control this in the studio by using soft boxes or flash diffusers which cover or screen the bright bulbs. The same thing can be accomplished with using a diffuser.

There are even flash intensifiers such as the Rogue flash booster. This is designed when long range lighting is needed beyond the 10-15 feet of a pop-up flash.

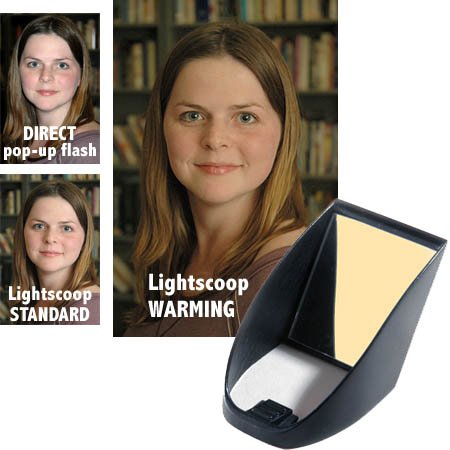
Pop-Up Universal Soft Screen Box External FlashRogue Safari DSLR Pop-Up Flash Booster (Black)Opteka PD-10 Universal Soft Screen Pop-Up Diffuserpangshi® Flash Bounce Reflector Card Diffuser ReflectiveMicnova Universal Soft Screen Flash Diffuser forProfessor Kobre’s Lightscoop, Warm Version Bounce Flash


How to use On Camera Fill Flash

Xpert Advice: How to Use Fill Flash for More Even Lighting

Before you shoot, turn on the flash and go into the menu of your camera (like the Fujifilm X100T) and select fill flash. Then you’ll need to fine tune it, so find the flash compensation menu. Turn the flash power down quite a bit; -2/3rds is a great …
Fill Flash In Wide Angle Macro Photography

Rather, I used a handheld flash set to sufficient power to bring the foreground caterpillars up to the same light levels as the sky. Fill flash is an effective technique. In the absence of a flash I could either expose for the sky, leaving the …
Fill Flash

We all know by now that natural light does not always work for every subject and one of those problems is the contrast that the sun can create on subjects that would be better off in soft light. Fortunately on-camera flash a great option for dealing …
How to Mix Ambient Light and Fill-Flash for Outdoor Portraits

If you would like to capture perfectly exposed images in ambient light, the real secret is to use fill-flash and a light modifier. Sure, if you have a reflector and an assistant you may be able to achieve similar results using only natural light.
Bit by Bit: A Digital Fill-Flash Technique for Improving Images

Many of the consumer and “prosumer” digital cameras have a built-in strobe flash that can be used for fill-flash — adding light to a brightly illuminated scene. But my Nikon D1X does not have a built-in flash, so I carry and use a separate strobe …
Using Fill Flash – Digital Photography School

In addition to helping with backlit subjects fill flash helps in more subtle ways also by helping to eliminate shadows cast by facial features (under eyes, noses, chins) or under hats – especially when light is shining down from above. It also might …
Eliminating Fill Flash Hard Shadows – A Controlled Test …

Defining the problem: While shooting a portrait outdoors, I usually add a fill flash to eliminate any “racoon eyes” and dark shadows on the face. The fill flash is set set at 1.7 stops under exposed for a light touch. My setup is a …
  • 8 On-Camera Flash Tips: How To Get Better Lighting From Your On-Camera Flash (digital-photography-school.com)
  • Photography 101 – Adjusting Your On-Camera Flash (tech4mommies.com)
  • Tips for Using Your Pop-up Flash (nikonusa.com)
  • i-TTL Balanced Fill Flash (nikonusa.com)

Filed Under: Photography Tagged With: Arkansas, canon rebel, canon rebel xs, fill flash, flash tips, Light, Missouri, photo tips, Photography, Photoshop, tips, travel, Vacation

Summertime Sports Photography

June 7, 2012 by info@3QuartersToday.com

I am always trying to expand my photography skills and shoot different topics, events, and subjects.

It isn’t often I have full permission from my  daughter to take my camera (Canon Rebel  XS) to her softball game. So when I got the chance I took it, and did I ever experiment with night action sports photography. Not easy, but I finally did get the hang of it.  I set my camera on manual and just played until I got it right.

Summer Softball- photography lesson

The above picture was taken with at 1600 ISO, 5.6 F stop, and a 1/160 shutter speed, 75 mm zoom with a continuous burst with the camera file size at small for a faster response.  With the exception of the graininess at the high ISO I’m pretty happy with the results.

Pitcher concentration

Again graininess with 1600 ISO, but right now I can’t see anyway around it, 800 was too dark with the needed shutter speed. The second photo was on large/RAW file size and was a little dark in the original image. With the lens resting on the fence I shot through the chain link at 300mm focal length, 1/160th of a second at a 5.6f

I increased the exposure in Lightroom, cropped the original horizontal shot to vertical, decreased the white and decreased the shadows. Don’t like how the grain distorts the background player, but couldn’t figure out a way to compensate.

Day of Softball and Summer
400 ISO,  1/125 sec, f10 focal 105mm  Aperture Priority

The last photo was obviously taken earlier in the night before the sun went down. All I did here was decrease the exposure, increase shadows, and warm the white balance. My camera tends to shoot cool (blue) and a the sun was glowing on all the players. I try really hard for realism in my editing and this is what my eye saw.

My daughter has played softball since T-ball in preschool starting at Elmwood-Murdock, then Lincoln Y-league, Eagle, and the past three years for Louisville. The Louisville team joined the Omaha league a few years ago and the first year they didn’t win a game. Competition was a little harder than their previous league and the girls had to try a little harder. The record the next year was about a 50:50 record.

A lot of the girls play on two teams, most of the teams are Select and have the intimidating matching travel bags, and “muscle” jerseys.  Most play school ball, but it doesn’t matter what they look like, can they play? My daughter loves the game, she only plays during the summer and she has a mean steal and isn’t afraid to use it and slide to where she wants to go.

Photography Tips

  • Anticipate your shots, know when the pitcher is going to throw.
  • Push your ISO as high as you need to get a 1/200 speed exposure
  • Use a lower aperture, backgrounds will blur, but you will accent your subject.
  • Use a tripod, monopod, or rest your camera on a steady surface. Fence gaps work well
  • Get the “personality” shots, the concentration of the pitcher, or first base.
  • Shoot in RAW for “still” shot, JPG continuous for action
  • Use your longest zoom for outfield shots, even 2nd base is a long ways off

I’m a big proponent of shooting in RAW, but there are many instances that a regular JPG photo will work just fine, especially if you taking the photos for yourself and just going to post to Facebook and share with friends. If you’re goal is to enlarge the photos, post them for sale, or use them commercially, then a camera with a wider range of options is necessary.

How to Photograph Night Sports

  • Understanding ISO Sensitivity (nikonusa.com)
  • Photography and the “Big 3″ (joshmsmith.wordpress.com)
  • ISO – What is it and how do I use it? (joestechthoughts.wordpress.com)
  • Aperture Priority and Shutter Priority: Exposure Lesson #1 (digital-photography-school.com)
  • American Legion Baseball (3QuartersToday.com)

Filed Under: Photography Tagged With: Adobe Photoshop Lightroom, Aperture priority, camera, canon, canon rebel, family, Film speed, Focal length, Nebraska, Omaha, Photography, Shutter speed, softball, sports, sports photography, summer

A Day at Work, With a Very Large Camera

May 15, 2012 by info@3QuartersToday.com

8x10 Large Format Film Camera
8×10 Large Format Transparency Camera

Here is something you don’t see very often, a large format, 8×10 E6 Film View Camera. At Hamilton Color Lab, located in Omaha Nebraska,  this isn’t used very often. But for high quality art reproductions which will be reproduced in a  40 x 40 foot canvas in this case, you need a camera format large enough to capture the detail and information.

After we develop the film (yes we still develop E6 slide transparencies)  it is then scanned on an Scitex Eversmart and digitized for outsource printing. The file size just for this one image is over one gigabyte and took over an hour to scan.

Most art reproductions we do at work are digital captures with a Canon 5D and a special lens made especially for photographing artwork, or flat images which eliminates lens distortion.

Below is the front of the camera, I know were curious and just itching to see more, so here is some camera eye candy for those film fans.

8x10 Film View Camera
8×10 Film View Camera

Dave Hamilton, owner of Hamilton Color Lab shoots with a Canon 5D on most days in the studio, but keeps his old Hasellblad camera, 4×5 Film Camera and this baby in storage for those unique moments. Not too many 8×10 View cameras in use anymore, and this one got quite a bit attention when it was brought out.

I know this post was a shameless plug for where I work, but I love working there and until I can get our company blog up and running I can’t resist sharing here.

Related articles
  • 35mm Film (filmphotographyisnotdead.wordpress.com)
  • How Large Format Cameras Are Made [Video] (cultofmac.com)

Filed Under: Photography Tagged With: Art, art reproductions, camera, Canon EOS 5D, E6 film, Large format, Nebraska, Omaha, paintings, Photography, slide film, View camera

Making Tulips “Pop” With Photoshop

April 6, 2012 by info@3QuartersToday.com

Photoshop is a powerful photography tool when used properly. My goal for most photo editing is to create an image that doesn’t look like it’s been edited. So let’s render an image of a tulip into something that pops just a little, but doesn’t take it over the edge.

Tulips after Photoshop Editing

See how subtle editing can improve a photograph without going over the top, as I have a tendency to do sometimes, according to my daughter.

Tulip SOOC (straight out of the camera)

This edit first involved adding a levels adjustment layer and darkening the whole image.  I selected the pink color in Image/Adjustment/Selective Color and added more magenta, which brightened the color in the petals.

The white portion of the petals seemed washed out so I then used the Burn tool and stroked over the creases in the bottom of the petal, which brought out the fine streaks.  I then used the sponge tool and desaturated the background.

I tried some special effects with this image, but I was never quite happy with them, so I settled on realism.

Learn How to Edit in Photoshop

120 Easy Tips And Tricks For Photoshop: LearningAdobe Photoshop CS6 Revealed (Adobe CS6)Adobe Photoshop CS6 Classroom in a BookAdobe Photoshop Elements 13Adobe Photoshop Lightroom 5Adobe Creative Cloud Photography plan (Photoshop CC +

Filed Under: Photography, Photoshop Friday Tagged With: Adobe Photoshop, Color, flower, flowers, fotofriday, friday, garden, Gardening, Gardens, Graphics, Image Editing, Petal, photo editing, Photoshop, photoshop friday, pink, Spring, Tulip

Butterflies and Lilacs: Signs of Summer Already

April 5, 2012 by info@3QuartersToday.com

image

Taken and posted to WordPress on my Android phone. Was curious on how it would look on the computer compared to my phone. Of course I want to work it up in Photoshop, but I’ll think I’ll leave that for another day.

Related articles
  • The Lilacs are Blooming (therousedbear.wordpress.com)
  • The 13 Best Summer-Blooming Shrubs (reallyhome.wordpress.com)

Filed Under: Photography Tagged With: Android, butterflies, camera phone, flowers, garden, insects, purple, Spring, summer

  • « Go to Previous Page
  • Page 1
  • Interim pages omitted …
  • Page 8
  • Page 9
  • Page 10
  • Page 11
  • Page 12
  • Interim pages omitted …
  • Page 17
  • Go to Next Page »

Primary Sidebar

Shop Amazon

Follow me on Twitter

My Tweets
Providing personalized graphic design work for individuals and small businesses

Best Place to Rent Cameras

Save Up To 20% Tiered Sale
  • RSS - Posts
  • RSS - Comments

Categories

Visit my Facebook Page

Visit my Facebook Page

Pages

  • About My Blogging World
  • Affiliate Disclosure
  • Army Gifts
    • Custom Army Gifts
  • Best Place to Print Political Yard Signs
  • Cool Gifts for Photographers and Camera Lovers
  • Food & Recipes
  • Google Search Results
  • Marine Boot Camp Resources for Parents
  • Marine Corps Gifts for Any Occasion
    • Best Gifts for Marine Corps Veterans
    • Marine Mom Gifts
    • Marine Mom Shirts & Gifts
    • USMC Ornaments
  • Military Gifts for Birthdays and Christmas
  • Personalized Custom Graphic Design Services
  • Unique Dog Gifts for Pet Owners

Recent Posts

  • Starting a Small Business in the Second Half of Life
  • Marine Corps Birthday and Veterans Day
  • Local Farmers Market Booth Ideas
  • High School Graduation Party Ideas
  • How I Became a Face Mask Designer

Tags

365project Advent animals Block Island christmas Connecticut cooking country dogs Elmwood-Murdock Faith family flowers Food God Holiday Holidays Lutheran Church–Missouri Synod marine Marine Corps memories midwest military music Nebraska Omaha pets Photography Photoshop postaday Product Review project365 recipe rural Silent Sunday small town snacks snow Spring summer tradition travel USMC video winter

Follow me on Twitter

My Tweets

Footer

Copyright © 2025 · Lifestyle Pro on Genesis Framework · WordPress · Log in


Loading Comments...